

Replacing the CPU fan on your Dell Inspiron 660s laptop might seem daunting, but with the right guidance, it can be a straightforward process. Whether you’re experiencing overheating issues or simply want to perform routine maintenance, this guide will walk you through each step of the CPU fan replacement process.
Identifying the Need for a CPU Fan Replacement
Before diving into the replacement process, it’s crucial to determine if your Inspiron 660s CPU fan actually needs replacing. Here are some telltale signs:
- Excessive noise: A failing CPU fan often produces a loud whirring or grinding sound, particularly under heavy load.
- Overheating: If your laptop frequently overheats, causing performance throttling or unexpected shutdowns, a faulty CPU fan could be the culprit.
- System instability: Overheating due to a failing fan can lead to random system crashes, freezes, or blue screen errors.
Gathering the Necessary Tools
To replace your Inspiron 660s CPU fan, you’ll need a few essential tools:
- Small Phillips screwdriver: For removing the laptop’s back panel and the CPU fan screws.
- Plastic pry tool: To gently pry open the laptop’s casing without causing damage.
- Compressed air canister: To clean out dust and debris from the fan and heatsink area.
- Anti-static wrist strap: To prevent electrostatic discharge from potentially damaging sensitive components.
- Replacement CPU fan: Ensure you purchase a compatible fan specifically designed for the Inspiron 660s model.
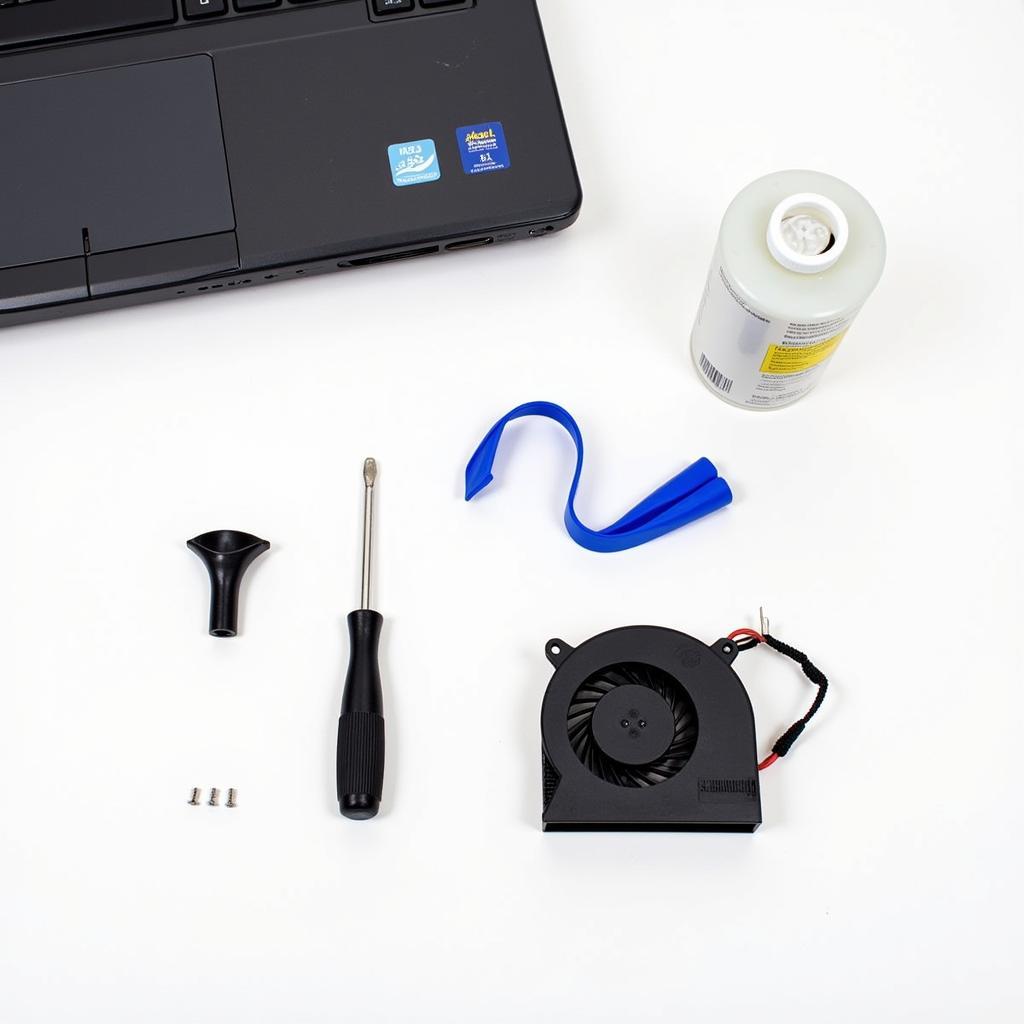 Essential tools for Inspiron 660s CPU fan replacement
Step-by-Step CPU Fan Replacement Guide
Once you’ve gathered the necessary tools and a compatible replacement fan, follow these steps:
-
Power down your laptop: Completely shut down your Inspiron 660s and disconnect the AC adapter.
-
Remove the battery: Slide the battery release latch and remove the battery from the laptop.
-
Access the back panel: Locate and remove the screws securing the back panel of your laptop. Use the plastic pry tool to gently pry open the casing.
-
Locate the CPU fan: The CPU fan is usually a small, square or rectangular component connected to the heatsink, typically located near the air vents.
-
Disconnect the fan cable: Carefully disconnect the fan cable from the motherboard.
-
Remove the fan screws: Unscrew the screws holding the CPU fan in place.
-
Detach the old fan: Gently lift the old fan away from the heatsink.
-
Clean the heatsink: Use the compressed air canister to thoroughly clean the heatsink fins and surrounding area, removing any dust buildup.
-
Install the new fan: Align the new CPU fan with the mounting holes and gently press it onto the heatsink.
-
Secure the fan screws: Reinsert and tighten the fan screws to secure the new fan in place.
-
Reconnect the fan cable: Connect the fan cable back to the motherboard.
-
Reassemble the laptop: Carefully align and snap the back panel back into place. Reinsert and tighten the back panel screws.
-
Reinsert the battery: Insert the battery back into the laptop and ensure it clicks into place.
-
Power on and test: Connect the AC adapter and power on your laptop. Monitor the system for any unusual noises or overheating issues.
Conclusion
Replacing the CPU fan on your Dell Inspiron 660s is a manageable task that can significantly improve your laptop’s performance and longevity. By following this comprehensive guide and taking necessary precautions, you can successfully replace the fan and ensure your laptop runs cool and efficiently.
FAQs
Q: Can I use any CPU fan for my Inspiron 660s?
A: No, it’s essential to purchase a CPU fan specifically designed and compatible with the Inspiron 660s model.
Q: How often should I clean my laptop’s fan and heatsink?
A: It’s recommended to clean your laptop’s cooling system every 3-6 months, depending on usage and environment.
Q: What if I replace the fan and my laptop still overheats?
A: If overheating persists, it’s advisable to consult a qualified technician as there might be other underlying hardware issues.
